
Η Ελλάδα διαθέτει την ιδιαιτέρωτη επιλογή να μπορείτε να απολαμβάνετε φρουτάκια, καζίνο, και δοκιμές της τύχης από την τηλεόρασή σας. Ωστόσο, να επιλέξετε ένα νόμιμο online καζίνο στην Ελλάδα μπορεί να είναι ένα μεγάλο ταξίδι. Αυτή η άρθρο θα σας δώσει κάποιες καλές γενικές ιδέες για να επιλέξετε ένα νόμιμο online casino Ελλάδα.
Είναι νόμιμα τα τυχερά παιχνίδια online στην Ελλάδα;
Η νομιμότητα των online καζίνο στην Ελλάδα έχει ρυθμιστεί από τον ευρωπαϊκό και εθνικό νόμο. Σύμφωνα με την ελληνική νομοθεσία, τα online καζίνο που λειτουργούν εντός του πλαισίου των κανονισμών είναι απολύτως νόμιμα. Παρέχοντας άδειες λειτουργίας μέσω της Ελληνικής Επιτροπής Παιγνίων (ΕΕΕΠ), εξασφαλίζεται η ασφάλεια και διαφάνεια των online τυχερών παιχνιδιών. Είναι σημαντικό να επιλέγουμε online καζίνο που έχουν αδειοδοτηθεί από την ΕΕΕΠ για να εξασφαλίσουμε τη νομιμότητα και αξιοπιστία της επιλογής μας.
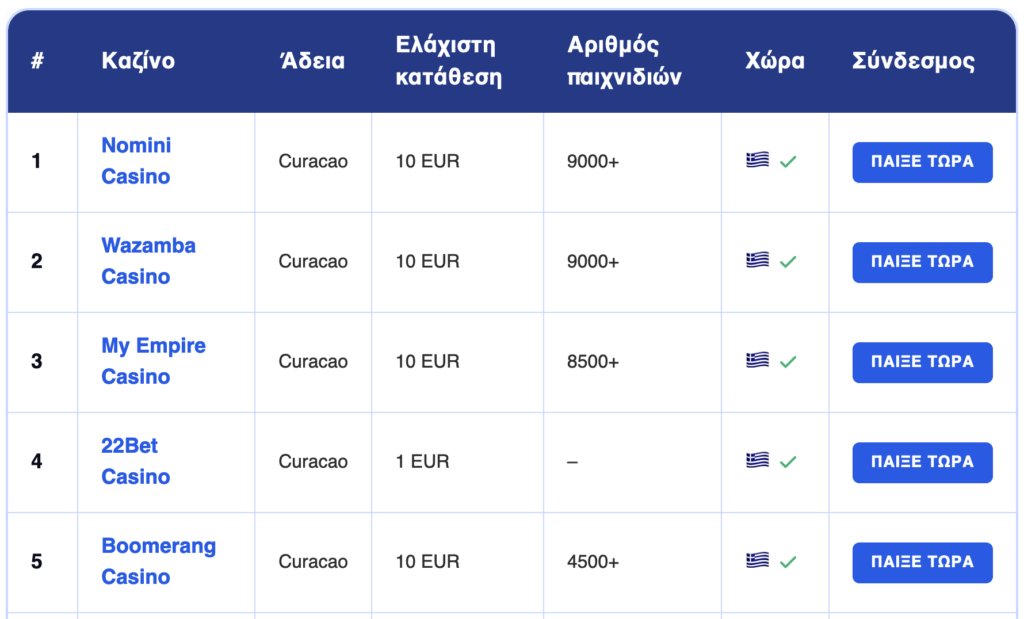
Καθώς τα online καζίνο κερδίζουν δημοτικότητα, εξακολουθεί να είναι ζωτικής σημασίας να εξασφαλίσουμε ότι το καζίνο που επιλέγουμε τηρεί τους κανονισμούς ασφαλείας και παρέχει δίκαιους όρους παιχνιδιού. Σε αυτό το άρθρο, θα αναλύσουμε κάποια από τα κορυφαία νόμιμα online καζίνο στην Ελλάδα για να σας βοηθήσουμε να κάνετε την πιο ενημερωμένη επιλογή.
1. Novibet Casino
Το Novibet Casino είναι ένα από τα πιο γνωστά και αξιόπιστα online καζίνο στην Ελλάδα, με άδεια από την ΕΕΕΠ. Προσφέρει μια πληθώρα από παιχνίδια καζίνο, συμπεριλαμβανομένων κουλοχέρηδων, μπλακτζακ, ρουλέτας και πολλών άλλων. Το Novibet είναι γνωστό για την εξαιρετική εξυπηρέτηση πελατών του και τις προσοδοφόρες προσφορές που διαθέτει συστηματικά στους παίκτες του.
Η πλατφόρμα του Novibet είναι εύκολη στη χρήση και πλήρως προσαρμόσιμη για κινητές συσκευές, επιτρέποντας στους χρήστες να απολαύσουν τα αγαπημένα τους παιχνίδια από οπουδήποτε. Επιπλέον, προσφέρουν ασφαλείς και γρήγορες συναλλαγές, διασφαλίζοντας την άνεση και την ασφάλεια των παικτών σε κάθε βήμα.
2. Stoiximan
Το Stoiximan είναι άλλο ένα κορυφαίο online καζίνο στην Ελλάδα, γνωστό για την ποικιλία των υπηρεσιών και παιχνιδιών του. Έχει αδειοδοτηθεί από την ΕΕΕΠ, προσφέροντας νόμιμα και αξιόπιστα τυχερά παιχνίδια στους παίκτες του. Το καζίνο Stoiximan διακρίνεται για την εύχρηστη και ελκυστική πλατφόρμα του, η οποία επιτρέπει στους χρήστες να απολαμβάνουν μια αξέχαστη εμπειρία παιχνιδιού.
Η επιλογή παιχνιδιών περιλαμβάνει από κλασικούς κουλοχέρηδες μέχρι και ζωντανά παιχνίδια καζίνο με πραγματικούς κρουπιέρηδες, προσδίδοντας μια ρεαλιστική αίσθηση στο παιχνίδι. Επιπλέον, το Stoiximan φημίζεται για τις γενναίες προσφορές του και τα συχνά μπόνους καλοσορίσματος, κάνοντάς το μια από τις κορυφαίες επιλογές για τους παίκτες στην Ελλάδα.
3. NetBet
Το NetBet είναι ένα ακόμη νόμιμο online καζίνο που προσφέρει πλούσια εμπειρία στους παίκτες στην Ελλάδα. Με άδεια από την ΕΕΕΠ, το NetBet διακρίνεται για την ποικιλία των παιχνιδιών του, τα οποία περιλαμβάνουν κουλοχέρηδες, επιτραπέζια παιχνίδια και ζωντανή ρουλέτα. Η εργονομία της πλατφόρμας του και η προσαρμογή για κινητές συσκευές το καθιστούν πολύ προσεγμένο και εύχρηστο.
Αξιοσημείωτο είναι ότι το NetBet θέτει τον πελάτη στο κέντρο της εμπειρίας παιχνιδιού προσφέροντας υψηλού επιπέδου εξυπηρέτηση, ασφαλείς συναλλαγές και γρήγορες πληρωμές. Οι συνεχείς προσφορές και μπόνους για τους νέους και υπάρχοντες παίκτες ενισχύουν τη θετική εμπειρία παιχνιδιού και το κάνουν μια αξιόπιστη επιλογή.
4. JackpotCity Casino
Το JackpotCity Casino έχει κερδίσει μια σταθερή θέση στον κόσμο των online καζίνο στην Ελλάδα. Διαθέτοντας άδεια από την ΕΕΕΠ, εξασφαλίζει ότι οι παίκτες μπορούν να απολαμβάνουν νόμιμα και ασφαλή τυχερά παιχνίδια. Προσφέρει ευρεία γκάμα παιχνιδιών, από κλασικούς κουλοχέρηδες μέχρι σύγχρονα παιχνίδια καζίνο.
Η πλατφόρμα του JackpotCity είναι φιλική προς τον χρήστη και συμβαδίζει με τις τελευταίες τεχνολογικές εξελίξεις, παρέχοντας απαράμιλλη εμπειρία παιχνιδιού είτε από τον υπολογιστή είτε από κινητή συσκευή. Επιπλέον, η καλή φήμη και οι υψηλές προδιαγραφές ασφαλείας το καθιστούν μια από τις πιο αξιόπιστες επιλογές για τους παίκτες στην Ελλάδα.
5. Loki Casino
Το Loki Casino είναι ένα ανερχόμενο online καζίνο στην Ελλάδα που έχει κερδίσει τις εντυπώσεις των παικτών με τη μεγάλη ποικιλία παιχνιδιών και τις νεωτεριστικές δυνατότητες. Όντας νόμιμο και αδειοδοτημένο, το Loki Casino παρέχει ασφαλή και αξιόπιστη πλατφόρμα τυχερών παιχνιδιών. Η έμφαση στις καινοτόμες λύσεις, όπως τα κρυπτονομίσματα, προσφέρει πρόσθετες επιλογές στους παίκτες.
Πέρα από την επικαιρότητα των παιχνιδιών και της πλατφόρμας του, το Loki Casino διαθέτει άριστη εξυπηρέτηση πελατών και πολλές προσφορές που διαρκώς ανανεώνονται. Αυτό το καζίνο ενδυναμώνει την εμπειρία παιχνιδιού και το καθιστά ασφαλές καταφύγιο για τους λάτρεις των online καζίνο στην Ελλάδα.
Γιατί είναι σημαντική η επιλογή αξιόπιστων διαδικτυακών καζίνο;
Η επιλογή ενός αξιόπιστου online καζίνο είναι ένα κρίσιμο βήμα για κάθε παίκτη που επιθυμεί να απολαύσει μια ασφαλή και ευχάριστη εμπειρία τυχερών παιχνιδιών. Ένα αξιόπιστο καζίνο διασφαλίζει ότι οι προσωπικές σας πληροφορίες και τα χρήματά σας είναι προστατευμένα. Επιπλέον, τα νόμιμα καζίνο διαθέτουν όλες τις απαραίτητες άδειες και ελέγχονται αυστηρά από τις αρμόδιες αρχές, διασφαλίζοντας ότι τα παιχνίδια τους είναι δίκαια και αξιόπιστα.
Η επιλογή ενός μη αξιόπιστου καζίνο μπορεί να οδηγήσει σε χαμένες καταθέσεις, αδίστακτες πρακτικές και πιθανώς σε κλοπή προσωπικών πληροφοριών. Γι’ αυτόν τον λόγο, η ενημέρωση σχετικά με τα νόμιμα και αξιόπιστα casino online στην Ελλάδα είναι ζωτικής σημασίας για την προστασία σας και την απόλαυση σας.
Τα πέντε πιο σημαντικά πράγματα που πρέπει να γνωρίζετε όταν επιλέγετε τον καλύτερο ιστότοπο για τυχερά παιχνίδια
– Άδεια και Ρυθμιστική Αρχή
Η ύπαρξη άδειας από αναγνωρισμένη ρυθμιστική αρχή, όπως η Hellenic Gaming Commission, είναι απαραίτητη για την ασφάλεια και την αξιοπιστία ενός νέου καζίνο στην Ελλάδα. Αυτή η άδεια διασφαλίζει ότι το καζίνο λειτουργεί εντός νόμιμων πλαισίων και υπόκειται σε τακτικούς ελέγχους.
– Τρόποι Πληρωμής
Ο τρόπος και η ποικιλία των διαθέσιμων πληρωμών είναι σημαντικοί παράγοντες για την επιλογή ενός καζίνο online στην Ελλάδα. Βεβαιωθείτε ότι το καζίνο προσφέρει ασφαλείς και γρήγορους τρόπους πληρωμής που σας εξυπηρετούν όπως κάρτες, τραπεζικές μεταφορές και ηλεκτρονικά πορτοφόλια.
– Ποικιλία Παιχνιδιών
Η μεγάλη ποικιλία παιχνιδιών είναι σημαντική για την εμπειρία σας ως παίκτης. Τα καλύτερα casino για Έλληνες παίκτες προσφέρουν μια ευρεία γκάμα παιχνιδιών συμπεριλαμβανομένων κουλοχέρηδων, τραπεζικών παιχνιδιών, και ζωντανών καζίνο με πραγματικούς ντίλερ.
– Υποστήριξη Πελατών
Ένα αξιόπιστο καζίνο πρέπει να προσφέρει εξαιρετική υποστήριξη πελατών. Αυτό συμπεριλαμβάνει 24/7 εξυπηρέτηση μέσω ζωντανής συνομιλίας, τηλεφώνου και ηλεκτρονικής αλληλογραφίας. Βεβαιωθείτε ότι το καζίνο έχει θετικές αξιολογήσεις για την εξυπηρέτηση πελατών του.
– Κριτικές και Αξιολογήσεις
Πριν εγγραφείτε σε ένα νέο καζίνο, διαβάστε τις κριτικές και αξιολογήσεις άλλων παικτών. Αυτό θα σας προσφέρει μια πραγματική εικόνα των ευνοϊκών και δυσμενών σημείων του καζίνο. Δώστε προσοχή στα σχόλια σχετικά με την αξιοπιστία των πληρωμών, την υποστήριξη πελατών και τη συνολική εμπειρία.
Πώς θα αντιμετωπίσετε τον εθισμό στα τυχερά παιχνίδια
Ο εθισμός στα τυχερά παιχνίδια είναι ένα σοβαρό θέμα και μπορεί να έχει σημαντικές επιπτώσεις στην προσωπική και κοινωνική ζωή των ατόμων. Εάν νιώθετε ότι χάνετε τον έλεγχο, υπάρχουν διάφορες στρατηγικές και πόροι για να σας βοηθήσουν.
Πρώτον, να θέτετε όρια στο χρόνο και το χρήμα που ξοδεύετε στα παιχνίδια. Πολλά ελληνικά online casino προσφέρουν εργαλεία αυτοπεριορισμού. Δεύτερον, αν νιώσετε ότι έχετε δυσκολία, αναζητήστε βοήθεια από ειδικούς ή οργανισμούς που ασχολούνται με τον εθισμό, όπως είναι οι Ανώνυμοι Τζογαδόροι.
Ποια καζίνο μπορείτε να επισκεφθείτε με φυσική παρουσία στην Ελλάδα;
Για όσους προτιμούν τη φυσική παρουσία, η Ελλάδα διαθέτει μερικά από τα πιο εντυπωσιακά καζίνο. Μπορείτε να επισκεφθείτε το καζίνο του Λουτρακίου, το μεγαλύτερο καζίνο στην Ελλάδα, που προσφέρει μια πλούσια γκάμα παιχνιδιών και πολυτελείς εγκαταστάσεις.
Άλλα αξιόλογα παραδείγματα είναι το καζίνο της Θεσσαλονίκης και το Καζίνο της Πάρνηθας στην Αθήνα. Τα καζίνο αυτά συνδυάζουν την εμπειρία του τζόγου με υψηλή ποιότητα παροχών και υπηρεσιών, δημιουργώντας έναν ιδανικό προορισμό για τους λάτρεις του τζόγου.
Κριτήρια για την αξιολόγηση
Όταν επιλέγετε ένα νόμιμο casino online στην Ελλάδα, είναι σημαντικό να λάβετε υπόψη σας συγκεκριμένα κριτήρια που διασφαλίζουν την ασφαλή και εξυπηρετική εμπειρία παιχνιδιού. Πρώτα απ’ όλα, η έκδοση άδειας από την Ελληνική Επιτροπή Παιγνίων (ΕΕΕΠ) αποτελεί βασική προϋπόθεση. Η κατοχή σχετικής άδειας εξασφαλίζει ότι το καζίνο λειτουργεί νόμιμα και υπόκειται σε αυστηρούς ελέγχους και κανονισμούς.
Άλλα σημαντικά κριτήρια περιλαμβάνουν την ασφάλεια και την αξιοπιστία των συναλλαγών. Το καζίνο πρέπει να χρησιμοποιεί τεχνολογίες κρυπτογράφησης SSL για την προστασία των προσωπικών και οικονομικών πληροφοριών των χρηστών. Επίσης, προτείνεται η αναζήτηση διεθνών πιστοποιήσεων από οργανισμούς όπως το eCOGRA, που εγγυώνται τη δικαιοσύνη και την ασφάλεια των παιχνιδιών.
Πώς ελέγχουμε τα online καζίνο;
Εμείς στην πλατφόρμα μας ελέγχουμε τα online καζίνο με στόχο να παρέχουμε αξιόπιστες και ενημερωμένες πληροφορίες στους χρήστες μας. Η διαδικασία αξιολόγησής μας περιλαμβάνει αρκετά στάδια, από την πρώτη εγγραφή μέχρι την αποπληρωμή των κερδών. Αρχικά, δημιουργούμε λογαριασμό στο ιστοσελίδα του καζίνο και δοκιμάζουμε τα παιχνίδια και τις υπηρεσίες που παρέχει.
Επίσης, αξιολογούμε την εξυπηρέτηση πελατών, δοκιμάζοντας τις διάφορες μεθόδους επικοινωνίας, όπως το live chat, το email και το τηλέφωνο. Καταγράφουμε τον χρόνο απόκρισης και την ποιότητα των απαντήσεων που λαμβάνουμε. Τέλος, αξιολογούμε τη διαδικασία πληρωμών, εξασφαλίζοντας ότι οι αναλήψεις πραγματοποιούνται γρήγορα και χωρίς προβλήματα.
Βασικά πράγματα που πρέπει να γνωρίζετε για την επιλογή σας
Η επιλογή του κατάλληλου καζίνο ιντερνετ είναι ένα σημαντικό βήμα για μια ευχάριστη και ασφαλή εμπειρία παιχνιδιού. Πριν εγγραφείτε σε ένα καζίνο, επιβεβαιώστε ότι προσφέρει μια ευρεία ποικιλία παιχνιδιών από γνωστούς παρόχους λογισμικού. Οι φορείς όπως οι NetEnt, Microgaming και Playtech είναι σημάδι ότι βρίσκεστε σε μια αξιόπιστη πλατφόρμα.
Επίσης, είναι σημαντικό να εξετάσετε τις διαθέσιμες μεθόδους πληρωμής. Βεβαιωθείτε ότι το καζίνο υποστηρίζει δημοφιλείς και ασφαλείς μεθόδους, όπως οι τραπεζικές κάρτες, τα ηλεκτρονικά πορτοφόλια και οι προπληρωμένες κάρτες. Τέλος, ελέγξτε τις προσφορές και τα μπόνους που παρέχει το καζίνο. Ένα καλό καζίνο πρέπει να προσφέρει ελκυστικά μπόνους καλωσορίσματος και συνεχιζόμενες προσφορές για τους τακτικούς παίκτες.
Η επιλογή των καλυτερα online casino δεν είναι απλή διαδικασία και απαιτεί προσεκτική έρευνα. Με τις συμβουλές μας, μπορείτε να είστε σίγουροι ότι κάνετε μια ασφαλή και ενημερωμένη επιλογή. Καλή τύχη και καλό παιχνίδι!